
This guide is on a Chevy Silverado but the principles can be applied to any vehicle that is using a suspension block.

What is a lift block? A lift block goes between a vehicles leaf springs and axle to space the vehicle higher. They are typically used with lift kits but also some auto manufacturers install them from factory.

Why you don't want lift blocks: The main reason you don't want to use a lift block is they promote adverse driving characteristics. Under acceleration a block puts more leverage on the springs causing axle wrap (wheel hop). During this scenario you loose much needed traction making towing, getting on the freeway, or climbing extremely difficult. Blocks also promote premature wear on drive shaft U-joints as the pinion will climb way more than it is designed to. It also can wreak havoc on your leaf springs, as you can see in our Silverado they are starting to get a "S" shape.

Shackle Reversal: We are going to use one of our shackle reversal kits to remove the blocks on this truck. This is a Chevy Silverado with a 6" Lift. The reversal is great because it keeps the ride really nice and doesn't cause axle wrap/damage.

Lets get started: Like every time you work on your vehicle you should practice safety (jack stands, blocking tires, glasses, gloves, hearing protection, etc, etc). It's really nice to have a lift for doing this procedure but today we are going to be using jacks and jackstands.
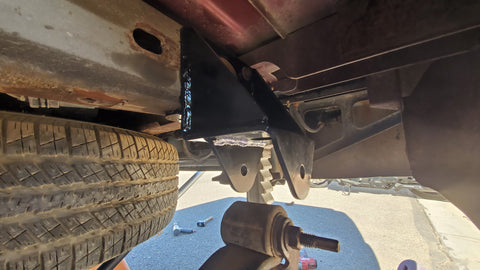
If your truck has a hitch that encompasses the shackle hanger like this one, start by removing it.

After the frame is on jack stands and tires are off we are going to remove the blocks from the leaf springs and axle by removing all the u bolts. A jack under the axle can help with taking pressure off. Make sure you don't overstretch any lines.

If your truck has a tail pipe that will hit the leaf spring after the reversal is installed this is a good time to trim it back.

After that is complete you have two options, remove the shackle from the bracket then remove bracket from frame or the opposite. We elected to remove the bracket from the frame so we could have more access to the shackle for removal. An air chisel makes easy work of the factory rivets. On this Silverado there is one bolt on the horizontal side of the frame that has to be removed. It has a captured nut in the frame.

On this Silverado is a small tack weld on the lower brace, a cut off wheel or air chisel make easy work of it for removal.

Now the frame is ready for installation of the shackle reversal

Now install the Shackle reversal to the frame. We found it easier to install the horizontal bolts first and snug them down then do the vertical ones. After all bolts are installed torque to spec (this one is 60 ft/lbs) If you are reinstalling your hitch make sure to leave those holes open for later. Note: shackle reversal offset points towards the front of the truck.
Remove the shackle from the stock frame hanger, turn it and install. Make sure to torque bolts to your vehicles manufacturers specs.

Installing a shackle reversal will typically move the axle forward 1" (unless you are using it with one of our rear drop main eye brackets). You can easily move the axle back to stock with one of our axle relocation plates. The other thing that can happen is pinon angle changing, this can be brought back by using a leaf spring shim. What we did was measure pinon degree at before taking everything apart, then setting the full weight of the truck on the axle with the reversal installed and measuring again. We used a shim to correct the difference, in our case a 4 degree shim was all that was needed. There are many free phone aps for measuring your degree available.
Here we are installing the Hogback fab leaf spring relocation plates and leaf spring shim. To do this we have to remove the leaf spring center pin. This can be done by C clamping the leafs together and removing the pin. We set it so the relocation pin makes the axle move 1" towards the rear, the excess was trimmed off with a flap wheel.
The bolt went through the leafs, through the shim, and is threaded into the relocation plate, that excess is trimmed off the bottom. A hole is drilled in the top plate 1" back for the new axle position.


We then finished everything off with a set of stock replacement u bolts, of course torqued to the auto manufactures spec.

Now put everything back together and enjoy your plush ride! After 100 miles be sure to re-torque all bolts. If you are reinstalling a hitch that encompasses the shackle hanger bracket .25" spacers may be needed.


